Cost Schedule Item
New | Edit Item
Work Groups are built-up of Items which you can setup to enter supplier quotes, material and labour costs and auto quantify an amount required. They can receive quantities sent from Plans and link to other items within the same Work Group. They also link to Timber List items to auto-fill their details, quantity, and cost.
Enter a quantity, supplier quote, or allowance to include the item and activate its linked items. Also, you can interchange Item on Standby with Included by clicking the item status icon. Note, from job to job your items on standby selections save to memory your preference from the previous job selections.
![]() = Not Included
= Not Included
![]() = Not Included, Item on Standby, (select the icon to Include / Not Include)
= Not Included, Item on Standby, (select the icon to Include / Not Include)
![]() = Included (click the item icon to not include)
= Included (click the item icon to not include)
Selections
1) Standard (default)
This is the most popular Item setup option. It allows you to manually name and enter a rate for the Item or use the Pricing (Price List Item) selections to auto name the populate a rate of the item from your SoloAssist Price List.
2) Supplier Quoted
This is used for Items that require you to enter a Supplier or Sub Contractor quoted amount. Typically, these items are setup at the top of the Work Group. They are identified with Quoted by: showing for the item. The Suppliers name will show after Quoted by: when selected. E.g: Quoted by: Electrical Assist
3) Allowance
This is used for items that only require an allowance or estimate amount to be manually entered.
4) Sub Heading
This is used for sub heading row breaks between items within a Work Group. They can be identified as a white background with no vertical column lines.
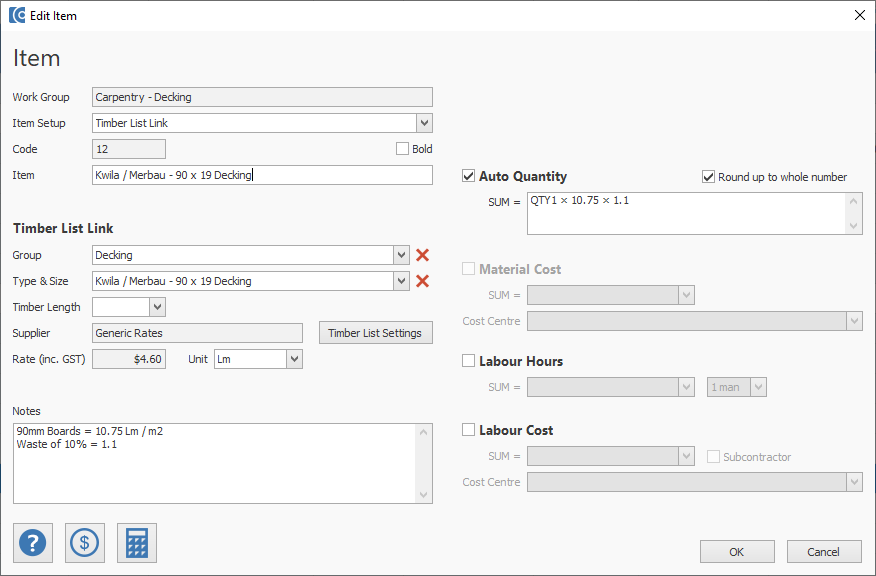
5) Timber List Link
This is used to setup an item link from a Cost Schedule Item to a Timber List Group and Item.
6) Timber List Total
This item selection can only be used once. It transfer the Timber List view Total to the Cost Schedule. Typically, it is setup in a Work Group called Timber Supply.
7) Quantity Calculator (m3)
This selection is used for calculating cubic meters (m3). Typically, it is used in Work Groups for Concrete Slabs & Footings to calculate m3. If you want to add more sizes to the list, scroll to the bottom and fill in the spare item row. A new row will then appear to add another item row.
8) Architrave Calculator (Lm)
This selection is used for calculating Architrave for windows and doors. Typically, this item is setup in a Work Group called Carpentry - Fixout.
9) Job Specifications - Total Included
This Item can only be setup once. Typically, it is setup in a Work Group called Job Specifications. This will transfer the Included Total from the Job Specifications view to the Cost Schedule Work Group Item.
10) Job Specifications - Total Prime Cost (PC)
This Item can only be setup once. Typically, it is setup in a Work Group called Job Specifications. This will transfer the Prime Cost Total from the Job Specifications view to the Cost Schedule Work Group Item.
11) Job Specifications - Total Provisional Sums (PS)
This Item can only be setup once. Typically, it is setup in a Work Group called Job Specifications. This will transfer the Provisional Sum Total from the Job Specifications view to the Cost Schedule Work Group Item.
User Tip: Ensure to setup your supplier price lists in SoloAssist, it makes quoting faster and more accurate.
User Tip: Ensure to setup your suppliers in the SoloAssist Price List. It makes quoting faster and more accurate.
Equations
If you select Round up to whole number, the calculation will round any decimals up to a whole number quantity.
Calculator
The green Items button lets you select an item quantity within the same Work Group to use in the SUM = equation.
SUM = Equation
Standard mathematics rules apply.
The below Auto Quantity equation example is working out the number of post for a Retaining Wall.
QTY4 = Quantity of Item 4 (of that Work Group). In this case, it's a length of Retaining Wall in Lm.
QTY6 = Quantity of Item 6 (of that Work Group). In this case, it's a length of Retaining Wall in Lm.
2.4 = 2400mm is the post centres spacing for the Retaining Wall.
1.1 = Waste of 10%
The tick box for Round up to whole number means the finished calculation will remove any decimal places and round up the number up to a whole number.

Calculator
QTY = Quantity of this Item
RATE = Rate (inc. GST) of this Item, or if marked no GST then Rate (ex. GST)
Equation
Standard mathematics rules apply.
SUM = QTY (Earthworks - Machine Hire Hours) x RATE (110.00 / hr) = Material Cost

Calculator
QTY = Quantity of this Item. This is a variable job to job
RATE = Rate (inc. GST) of this Item, or if marked no GST then Rate (ex. GST)
LR1 = Labour Rate 1 = $66.00 / hr (This Rate is editable in Cost Schedule Settings)
LR2 = Labour Rate 2 = $77.00 / hr (This Rate is editable in Cost Schedule Settings)
LR3 = Labour Rate 3 = $88.00 / hr (This Rate is editable in Cost Schedule Settings)
Equation
Standard mathematics rules apply.
SUM = QTY (of Earthworks - Machine Hire Hours) x 2 hr (per 1hr for 2 men) = Labour Hours (for this task).

Calculator
QTY = Quantity of this Item.
RATE = Rate (inc. GST) of this Item, or if marked no GST then Rate (ex. GST)
LH = Total Labour Hours of this item task
LR1 = Labour Rate 1 = $66.00 / hr
LR2 = Labour Rate 2 = $77.00 / hr
LR3 = Labour Rate 3 = $88.00 / hr
Note: The Labour Rates are editable in the Cost Schedule Settings.
Equation
SUM = LH (Labour Hours Total) x LR1 (Labour Rate 1 is $66.00 / hr) = Labour Cost (of the task).
Note: Standard mathematics rules apply.

This opens the default calculator on your computer for extra mathematical brain power.
Opens the Price List to add new items, editing existing items, update prices and add supplier price lists. Live Pricing is also found on the Price List screen which allows you to import supplier price files or connect directly using the Live Pricing 24/7 supplier connection.
Opens the SoloAssist Help Centre to the topic you're currently in.