Cost Schedule
Overview
The Cost Schedule is the main quoting view. It's built up of Work Groups with items to add Materials, Labour, Supplier or Subcontractor quotes, and allowances. The Timber List and Job Specifications view totals, are transferred to their own Work Groups in the Cost Schedule. Your business markup allowances are added and viewed at the bottom of the Cost Schedule.
User Tips
- Work Group items will show as OFF in light grey, until you enter a quantity, supplier quoted amount, or allowance.
- Items within a work group can be setup with auto quantity equations to calculate other required items to complete the work group task. These items will add, quantify, and price into the job automatically.
- Use our Plans on-screen takeoff, to measure your quantities and send them into your work group items, to quote the job.
Toolbar
This saves all changes to the current open job.
Add a new Work Group, then add items to it to build up its total cost.
Use each group status to track what's Not Included, Incomplete, or Completed.
![]() Not Included
Not Included
![]() Incomplete
Incomplete
![]() Completed
Completed
User Tips
- When adding a new work group, locate where it's added by selecting the group below where you want it added above.
- Work Groups can be re-ordered by drag and dropping them to a new location and changing their Code #.
- Use the (chevron) arrow to open and close a Work Group, or double click on its header or sub total row.
Deletes the selected Work Group/s. Once deleted, it cannot be undone.
Use your mouse cursor to drag & drop a group up or down to a new location.
This adds a new Item to the selected Work Group. It can be setup to auto quantify a material cost, labour hrs, labour cost or to add a supplier quote amount. These Items can received quantities sent from Plans and setup multiple item quantity equations within the same Work Group to speed up the quoting process.
Items Status
There are 3 types of item status.
![]() Not Included
Not Included
This icon shows when no quantity, supplier quote, or allowance has been entered. Once a quantity, supplier quote, or allowance has been entered, the item status icon will display either as included or item on standby.
![]() Not Included / Item on Standby
Not Included / Item on Standby
This means not included, but the item has a quantity, auto quantity, supplier quote, or allowance ready to include.
Click the items status icon to include or not included.
![]() Included
Included
This will include either a quantity, supplier quote, or allowance.
Click the items status icon to include or not included.
Deletes the selected Item/s. Once an Item has been deleted, it cannot be undone.
Use your mouse cursor to drag & drop an item up or down the Work Group to reorder it.
Opens the Job Details window to enter the Site information, Client/s details, Client Representative details, and log the jobs documentation and plans for tracking design changes.
Opens the Price List for updating prices, adding or editing items, and setting up suppliers price lists. It also opens the Live Pricing to import price files from your suppliers manually or directly using the 24/7 Live Pricing supplier connection.
This opens the plans on-screen takeoff measuring tool. This enables you to add job plans, calibrate them to scale, then start measuring quantities, sending them into your quote as you go. We recommend to setup your device with duel 27“+ screens to optimise your plans visually and increase your efficiency.
Measure: Areas, Vertical Areas, Roof Areas, Lengths, Lengths (with heights), Counts, Counts (with lengths), and Volumes.
Opens the default calculator on your computer for quick manual calculations.
Opens the Cost Schedule Link Reports to check for broken links between views. The Link Reports should show as empty if all links are correctly set up.
Opens the Cost Schedule Settings to edit your Business Markups, Labour Rate, Workday Hours, Columns On/Off, Variations Default Markup %, and auto Renumber Work Groups and Items sequentially.
Allows you to export the Cost Schedule data to CSV, which can be imported into other applications, such as Excel.
Importing a CSV file to Excel
Open Microsoft Excel ► Open New Blank workbook ► Go to the Data tab ► Select From Text/CSV (Get & Transform Data) ► then find & open the CSV file you're wanting to view or edit ► File Origin 1252: Western European (Windows) ► Delimiter Comma ► Select Load
If you require assistance, please contact your local IT technician.
Opens the SoloAssist Help Centre to the topic you are currently in. Learn more faster!
This allows you to only view items added into the job. All unused Items will be hidden, and Work Groups unused will not open.
Related features to this view
See the Help Centre Print Options to learn more.
Contract Total Display
Contract Total Display, Override, Lock, Unlock
Contract Total Display
- A double click on the Total amount, will open the Business Markup settings.
- A double click on the Padlock will open the Contract Total Lock / Unlock.
- A double click on the Job will open the Job Details.
- A single click on the arrow will open the jobs list.

Contract Total - Update Pricing

This will update the pricing on the Cost Schedule, Timber List and Job Specifications to your latest Price List database shared pricing. This will only update the prices of items connected to the price list that have been updated.
If the UPdate Pricing button is not showing next to the COntract Total as seen above. It means either your price list database has not been activated yet, or your quote/job file is not compatible to use this feature. To learn more about your Price List database, go to Home menu ► Options ► Databases ► Price List, then click the help button and read the instructions.
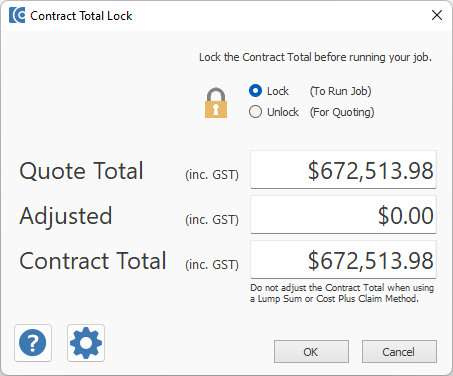
Contract Total Lock / Unlock
![]()
![]()
The Contract Total is only locked once the client has signed the contract for that price.
Locking the Contract Total ensures the Progress Payments stage amounts remain the same if you decide to adjust quantities or make cost changes.
If you have Unlocked the Contract Total and it has adjusted, you can enter the original Contract Total then lock it again if required. Check the Progress Payment stage totals have adjusted back to their correct claim amounts.
Re-entering Sales Invoices and payments received in chronological order may be required to re-balance the progress payment stages.
Contract Total - Override
In the Contract Total Lock window, you can manually override the Contract Total if required. The adjusted difference will then show at the bottom of the Cost Schedule either in greenprofit or - red loss.
How do I...
Add New Work Groups?
To add a new Work Group, follow the steps below.
Note: After the Work Group has been added, you can drag & drop it to a different location if required. Additionally, if you want to make the Work Group code number inline with the other Work Groups above and below it.
Go to the Cost Schedule toolbar, click Settings (![]() ) and press Renumber Sequentially.
) and press Renumber Sequentially.
Add New Items?
Before proceeding, read the Cost Schedule Items page.
To add a new item to a Work Group, follow the steps below.
Cost Schedule Items can be setup multiple ways for different purposes. Ensure to read the Cost Schedule Item instructions before proceeding. The good way to learn how different items are setup, is to start a new job using the sample template. Then see how the existing items in different work groups are setup.
Click here to learn more about Cost Schedule Items:
Add Suppliers or Sub Contractors Quoted Amounts?
To add a Suppliers Quoted amount, follow the steps below.
To Items setup as Supplier Quoted, you will be able to enter the quote amount directly into grey field of that item on the main screen. But if you open to the item setup, you can select your suppliers name and enter the quote amount. The Supplier name will show after Quoted by: for the item.
E.g: Quoted by: EDK Electrical
User Tip
Ensure your Suppliers details are setup in the Suppliers view before you start quoting, otherwise you will not be able to select their names for the Supplier Quoted items.
Change the Description or Rate of an Item?
Depending on your Item Setup, it will require a different process to change its Description or Rate. All (4) methods are listed below.
Standard (default)
This item is not linked to a Price List item.
If the Item is showing without the Pricing Price List Item fields selected, then you can manually change the Description, Rate(ex. GST or inc. GST) or Unit fields directly in the Item setup window.
Then click OK to finish.
Standard (default)
This item is linked to a Price List Item.
If the Pricing Price List Item fields have been pre-selected, then double click on either Rate (ex. GST or inc. GST) field or click the Price List button in the bottom left-hand corner. Both options will open the Price List with the Item pre-selected for you to edit the Item Description, Rate and Unit. Then click Close X in the top right-hand corner and it will auto save the changes and take you back to the Item setup window in which you should see the updated changes.
Then click OK to finish.
Supplier Quoted or Allowance
The Supplier Quoted and Allowance amounts can be changed directly on the Cost Schedule main screen in the grey Rate (inc. GST) field.
Additionally, you can make changes from in the Item setup window. Select the item and click (![]() ) Edit Item, or double-click on the Item name to open the Item setup window and make your changes.
) Edit Item, or double-click on the Item name to open the Item setup window and make your changes.
Then click OK to finish.
Timber List Link
For Cost Schedule Items setup with a Timber List Link. You will need to press the Timber List Settings button beside the Supplier name field. This will open the Timber List Settings window with the Item pre-selected. In this window, note the Price List Supplier name allocated for the Timber Type. Then double-click on the item your wanting to change. This will open the Price List with the Item pre-selected for you to edit. Before editing the Rate, ensure it has the correct Price List Supplier name selected. After you have edited the Item. Then click Close X in the top right-hand corner and it will auto save your changes and go back to Timber List Settings which should show the updated changes. Click Close. Now you should be back at the Cost Schedule Item setup window which should be showing the updated changes.
Then click OK to finish.
Add PC and PS Item Allowances?
Prime Cost and Provisional Sum Item allowances are added into your quote in the Job Specifications view. The Job Specifications is setup to track each PC & PS Item allowance and the overall PC & PS amount totals. The Job Specifications overall totals are then transferred to the Cost Schedule Work Group ► Job Specifications. The Cost Schedule is where your Business Markups are applied onto the Job Specifications totals.
Note, Job Specifications Settings is where the PC & PS excess (overrun) markup percentage is set. Example: 20% (default)
Below are the (3) totals transferred from the Job Specifications view to the Cost Schedule ► Work Group ► Job Specifications.
1) Total - Included Items (These are item allowances that are not PC or PS items.) 2) Total - Prime Costs3) Total - Provisional Sums
To learn more, see the Job Specifications page.
Change the Business Markups?
The Business Markups for each quote is edited in the Cost Schedule Settings. You can open the Cost Schedule Settings (3) different ways.
Add Items to a Quote?
In the Cost Schedule, you can add items to a quote (3) different ways.
Note: You cannot send quantities from Plans to Cost Schedule items setup with an Auto Quantity. Remember, these items can be identified by no grey quantity field to send to. Use dual screens to work efficiently. Put the Cost Schedule on one screen, and Plans on the other screen.
Print and Email a Quote?
Go to Print Options, select Print Quote (Lite) or Print Quote (Full Details) and any other selections required, then go to the Printer Setup and select Microsoft Print to PDF, then select Preview. After checking over and approving the document in Preview, select Print and you will be prompted to save the file to PDF. Then you can attach the PDF file to your email.
Check which Cost Centre Budget has been allocated for a Material or Labour Cost?
Hover your mouse cursor over a Material or Labour Cost on the Cost Schedule, and it will show you its allocated Cost Centre budget in Cost Control. Alternatively, open the item to see both Material and Labour Cost Centres allocated.
Export to a CSV file?
Go to the toolbar and select Export, then select either Contributing Work Groups & items or All Work Groups & Items. Then click OK to save the CSV file to your job folder.
Open Microsoft Excel ► Open New Blank workbook ► Go to the Data tab ► Select From Text/CSV (Get & Transform Data) ► Open the SoloAssist CSV file ► File Origin 1252: Western European (Windows) ► Delimiter Comma ► Select Load
Update QBCC Insurance?
QBCC = Queensland Building Construction Commission
The QBCC Home Warranty Insurance premium tables for New Home Construction and Alterations / Additions in SoloAssist, are kept updated by the SoloAssist software updates. You cannot manually update the QBCC premium tables.
Troubleshooting
Pricing not updating
If your Contract Total is locked, then your pricing for that job will not update, and the Update Pricing button next to the Contract Total display will be disabled. However, if your Contract Total is unlocked, select the Update Pricing button next to the Contract Total display to update the job pricing to your latest Price List changes.
Auto Save Backups
After you have saved your quote for the first time, SoloAssist will then start saving 5 backup file copies spaced at 15min, 30min, 1hr, 2hrs, 24hrs or older. These backup quote/job files are saved to the following folder location.
Backups Folder Location
This PC ► Local Disk (C:) ► Users ► (Your name) ► Documents ► SoloAssist ► Quotes & Jobs ► Backups
If you need to use one of the backup files, do not re-save it into the Backups folder. Copy it back into its job folder and rename it back to what was originally and remove the backup file extension. E.g. _15min, _30min, _1hr, _2hr, _Older.
Auto Save Backups can be turned On/Off in the Home (menu) Options.
My Contract Total changed after adjusting the Cost Schedule Settings / Business Markups?
The Cost Schedule Business Markups each calculate progressively from the last total above it, at the bottom of the Cost Schedule.
Example
If you combine the Job Contingency % and or Business Overheads % in with the Management Fee (Profit Markup) %, then your Contract Total Business Markups will calculate differently (and to less) to when each has been entered separately as layed out in the Cost Schedule Settings Business Markups.
User Tip: We recommend entering each of your Business Markups separately for accurate cash flow tracking totals.
My Cost Schedule is not displaying correctly
If your Cost Schedule work groups are not displaying correctly. Go to the grid header columns bar at the top and right-click the chevron (arrow) under the Cost Schedule heading, once or twice. This will reset the Cost Schedule work groups display.
Print Preview not working correctly
In the Cost Schedule, we recommend not entering an item quantity of more than 400 characters. Exceeding this limit may cause the print preview to not work correctly.