Getting Started
Welcome
If you're new to SoloAssist, we recommend getting started with our setup below. Then use the side menu to learn more about each SoloAssist view. If using the search field above, enter keywords with the exact terminology used in SoloAssist for best search results.
Setup
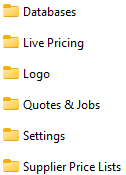
1. Default folder structure
After installing SoloAssist, there will be (6) folders setup in your (C:) ► Documents ► SoloAssist
To share between multiple devices and automate file backups, copy your SoloAssist folder into a central share location in OneDrive, Dropbox, Google Drive, etc.
Below is an overview of each folders purpose.
![]()
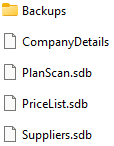
Your SoloAssist databases are stored here. Your Organisation details = CompanyDetails.xml, Plans (on-screen takeoff) = PlanScan.sdb, PriceList.sdb, and Suppliers.sdb
Should you need database recovery files, see your SoloAssist database Backups folder or your OneDrive, DropBox, or Google Drive account file backup/restore history.
In the SoloAssist default folder, you will find subfolders for storing Quotes Open that you are working on, as well as Quotes Closed that you did not win. There are also folders for Jobs Open that you won as well as Jobs Closed that you have completed.
The Backups folder stores the SoloAssist automatic time spaced backup files. This Backup folder is the first place to look when attempting to recover lost work.
![]()
This folder has multiple time spaced backups of all your quotes and jobs.
![]()
This is where you should be saving your new quote folders. To save folder setup time, you can copy & rename the Sample Job folder as its already setup for you to start. Then delete the Sample Template file out of the new copied folder.
![]() ►
► ![]()
The Sample Job folder is setup with sub-folders to show you an example of how a job can be setup. To save time, copy, rename and paste it into the Quotes Open folder for a new quote/job folder before starting a new quote.
![]()
This is for quotes you didn't win, move the job folder here.
![]()
This is for quotes won! Move the job folder here.
![]()
For completed jobs, move the job folder here to archive. These are best archived into yearly folders. e.g. 2019, 2020, 2021
2. SoloAssist setup
Follow the steps below to setup your SoloAssist estimating views.
From the SoloAssist Home menu, select New Job. Then select Use our sample template. Then fill-out the Job Details and save the job into your job folder.
Go to SoloAssist Home menu, select Organisation. Enter your Organisation details including your header logo. Then select Business Terms of Trade and setup your default terms & conditions for Business, Variations, and Sales Invoices. If using a copy of the Sample Template, it will already be setup with default terms & conditions for you to review, edit, and enter your 'Organisation name' where shown.
After starting your first quote/job, ensure to activate your Price List database. If you have already been using SoloAssist and have many quotes or job files, then click here, to read the instructions first. Otherwise, proceed below.
To activate your Price List database, go to your SoloAssist Home menu ► Options ► Databases ► Price List File Location ► press Activate
In Options, select the Help button to learn more.
Go to Home menu ► Add-Ons ► XERO or MYOB Connection, then select Connect.
Go to Suppliers, and add your suppliers details. This is mandatory before starting a quote or job. It will automate your supplier selections throughout SoloAssist to save time and enter quotes. If you're wanting to import your supplier details from XERO or MYOB, then select Settings in the toolbar.
Open the Price List and add your primary supplier names and link their details which should already be entered from your supplier view. Then enter each suppliers pricing to the items in the Price List that you will need to quote a job.
Use the Price List and Live Pricing Help buttons, to learn more.
To complete a quote, you only need to add items into the Cost Schedule, Timber List and Job Specifications.
Note: Deleting items from a quote or job, deletes them from your quoting template. Items not used, will not show or contribute in the quote print reports. It will only show your contributing items.
3. Starting your first quote/job
Before starting a quote, make sure you have setup a job folder and saved your plans into it or a sub-folder of it.
Go to your SoloAssist Home menu, select Start New Job. Then select Use a copy of the Sample Template. If you have already started several quotes, then choose Use a copy of an Existing Quote Template. Then select your most up-to-date quote file with template and price list changes.
The Job Details should open automatically. Enter the required details for the job into all tab views. e.g. Site Info, Client Details, Client Representative, and Documentation, then click OK to continue and save the job. Note, you cannot start quoting a job until it has been saved first.
The minimum required fields to fill-in to save a job, is the Site Address.
Save the new job into its own job folder. SoloAssist has pre-setup folders in Documents ► SoloAssist ► Quotes & Jobs ► Quotes Open. By default, SoloAssist uses the Job # and Site Address as the new job files save name, which is typically a good name for its job folder too.
See Manage job folders below, to learn more about setting up your job folders.
Auto Backups
SoloAssist will automatically create time spaced backups while you work. Backup quote files are located in Documents ► SoloAssist ► Quotes & Jobs ► Backups
Before adding plans, ensure the job plans have been saved into your job folder first. This ensures job-specific documentation stays together enabling SoloAssist to locate the plans from within the same folder or a sub-folder of it.
Compatible Plan image files: PDF, JPG, PNG, TIF, GIF.
The Cost Schedule, Timber List and Job Specifications are the only views needed for entering items, materials, labour, quantities and supplier quotes to complete your quote. Use the grey Quantity and Rates column fields to enter your item quantities, supplier or subcontractors quotes. Optionally, you can use Plans to measure quantities and send them directly into the job as you go. The other SoloAssist tab views help you run the job.
Before proceeding with your quote, make sure you have completed the SoloAssist Setup.
To complete your quote, you only need to add items in the Cost Schedule, Timber List and Job Specifications.
Don't delete items in your quote template if your not using them. This will affect your template for future quotes. Items not used (filled in), will not contribute or show in your quote or job reports.
4. Quoting guide
The following steps are a guide to start quoting.
To complete a quote, you only need to add items into the Cost Schedule, Timber List and Job Specifications.
Use the Cost Control view to check your overall quoted budgets as a summary.
Entering Quotes
All supplier or subcontractor quotes will get entered into the Cost Schedule items called Quoted by:. Double click on the item name 'Quoted by:' to open the item window, then select your supplier then enter the quoted amount. Then click OK.
Use Plans (on-screen takeoff) on your dual screen in conjunction with each view to measure-up and send your quantities into the job.
Try to enter and measure items in the same order you would build it.
Each view has a Help Centre link for How do I… and Troubleshooting user tips.
5. Evolve your job template
When selecting an existing quote as a template, SoloAssist automatically creates a copy of the quote removing any job-specific data entries, leaving you with a cleared up-to-date template ready to start the new quote. Hence, rolling forward all previous template and price changes.
Following this practice will evolve your quote template to suit your future business quoting structure. We recommend you have just one master template, rather than multiple templates you'll need to keep individually updated. But yes, you can have multiple templates if required e.g. Multiple Spec Home Designs.
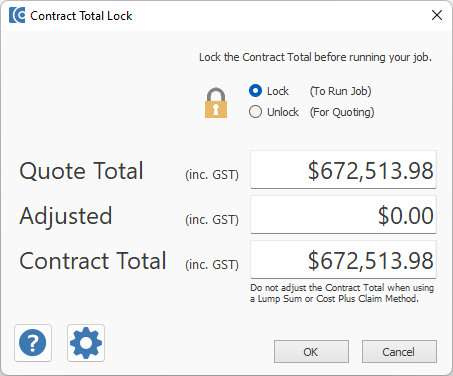
6. Contract Total Lock
To convert your quote to a job, follow the steps below.
Double click on the padlock in your quote/job file.

Select Lock (To Run Job), then click OK.
This locks the Contract Total as a fixed amount, and disables the Update Pricing button. This ensures the Contract Total and Progress Payment Stages won't readjust if you make changes to materials or labour items while running the job.
If you have saved your jobs to the SoloAssist default location in Documents ► SoloAssist ► Quotes & Jobs ► Quotes Open. Then move your job folder by 'cut & pasting' it from the Quotes Open folder to the Jobs Open folder. Then when you've completed the job, move it to the Jobs Closed folder. This keeps you organised and stops folder and files cluttering on your computer. Following this method, archives your job folders with its documentation as you go.
b) SoloAssist is designed to search the main folder of where you save your quote/job file, and its sub folders for the plans added in your on-screen takeoff. This helps to not lose the plans linked into your quote/job file.
c) Ensure you save the SoloAssist quote/job file (.quo) into your main job folder and not its sub folders. This allows SoloAssist to find your plans automatically if their links becomes broken.